Followers

Showing posts with label Martha Stewart punch. Show all posts

Sunday, 13 April 2014

Christmas Card Challenge #8

Hello everyone and welcome to my new followers.  It's time for another challenge over at Christmas Card Challenge and this time it's the lovely Asha of Sunny Summer Crafts who has chosen the theme which is:

Christmas Lights (candles, fairy lights, lamps, lanterns)

Now I have been really busy this week and had to leave making this card until yesterday after I had done a few hours of gardening.........so I merrily went about making my card; one of those times I knew exactly what I wanted to do.  Finished it, photographed it, just going to schedule my post and then a niggling thought in my mind made me check again...........yep, I'd read the wrong challenge and made a card for the next challenge due on 27th April.  Soooooo, panic stations - what shall I do, help, ummmmh!!!! lol  Anyway I gathered myself and then thought about what I had, if anything, to meet this challenge and then remembered my lovely MB candles die.


So I die cut  three sets, one in gold mirri, one in red mirri and one in green bazzill cardstock.  I then die cut my shape using Spellbinders Labels 8 and die cut the candles again from the centre of the label.  I then paper pieced all the elements back into the negative shape.  The sentiment is Tattered Lace.  Tartan paper and red and gold glittery paper from my stash, borders are a MS snowflake border punch to which I've added red Liquid Pearls.  Sorry for the quality of the photo, I just couldn't seem to get a good photo with all the mirri card.

Thanks for popping by...........at least there's no rush for the next challenge; mine's already made!!! lol

Happy crafting.


Sunday, 2 February 2014

Christmas Card Club Challenge #3

Hello everyone.  It's time for another challenge over at the Christmas Card Club and today's challenge has been set by the lovely Mary.  She's chosen "feature a heart/the colour red".

Here's my take on the challenge:


I've chosen a digi image from Make it Crafty - I just love this little guy don't you?  He's been printed out and then die cut using Lil'Inkers Stitched Circles dies which I've been hankering after for quite some time now!!! lol  Matted onto a matching red circle.  I then took a 6" square red card and folded back the front to create a "z" card.  I matted some Christmas d/p snippets onto white card stock and the inside panel has been punched using a Martha Stewart punch.
  
The hearts were diecut using Spellbinders dies and I punched a hole in the largest to add a silver bell mirroring the cute little guy's hat.  The sentiment is from JustRite Merry and Bright stamp set and I used my Stampin Up circle and scalloped circle punches.

Why don't you pop on over to the rest of the girls blogs (see my side bar for their links) to see what they came up with.

Thanks to my friend Kate I am also entering this into the Winter Wonderland challenge which is Digi Days.

Happy crafting.


Sunday, 26 May 2013

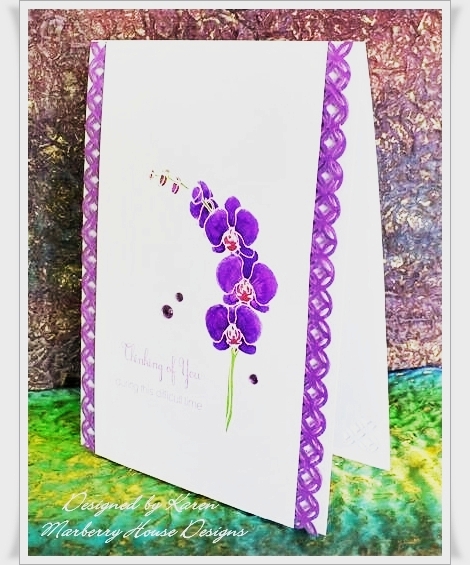
With sympathy - for Susan

Hello everyone.  Just wanted to share a sympathy card I've just made for my blogging buddy Susan Goetter who has just lost her beloved husband Butch.  I am sure many of you know Susan and admire her amazing talent both in card making and Zentangle.


For the card I have used the lovely orchid from Clearly Besotted "Thinking of You" stamp set.  I inked the stamp with Versamark and then embossed it with white detail e/p.  I then coloured it using Glimmer Mist (spray a small amount onto a piece of acetate) using a paintbrush.  For deeper colour let it dry and add another layer.  I've mounted it on a mat of purple cardstock and punched the edges with my Martha Stewart Modern Garland punch.  I stamped the sentiment using Stampin Up Orchid Opulence ink and then added some gems.

Thanks for dropping by.  I am sure you will keep Susan and her family in your thoughts this weekend.


Tuesday, 2 April 2013

Less is More - Lucky Dip - Scallops

Hello all - just a quick post today with my entry to the latest Less is More challenge which, this week, is:

As March is a month containing 5 Saturdays, once more we have a Guest Designer for our Lucky Dip Challenge!
We have chosen 
SCALLOPS


I think I might have got a teeny bit carried away with my card.......but I'll let you be the judge of that!
Base is an 8" square scalloped card.  The next layer has been put through my eBosser using my Darice Lace 12" e/f and embossed top and bottom edges.  The centre panel has been punched using a Martha Stewart scallop punch.  Two lines have been embossed on this piece and cream scalloped lace added.  The centre focal point is SU Apothecary Art stamps and die cut using the matching dies - mounted on kraft card.  I've added liquid pearls to the embossed edges.

Thanks for dropping by.


Saturday, 9 February 2013

ATCAS - Challenge #6 - Hosted by Shana

Welcome to another challenge here at Addicted to CAS!  Since Valentine's Day is right around the corner, what better way to celebrate than with some sugary sweetness!  Check out this week's code word, selected by Shana:

We have an awesome sponsor again for this challenge. Please let me introduce you to
Uniko Studio is a small company based in the North East of the UK. Uniko Studio specialises in surface pattern design & clear stamps for the hobby market. Uniko Studio will feature high quality photopolymer stamps designed & manufactured here in the UK, and if things go well we will branch out into other crafting supplies.
Beverley has been kind enough to offer a fabulous prize - digis from her store!
You can find her awesome selection HERE
 
Must admit I was a little bit stuck for ideas with this challenge as I didn't have any stamps candy/sweet related - most of them seemed to be related to cake (!!!) and was going to try and rely on a digistamp but then I remembered this sweet little image - get it??? Sweet - right.............   Anyway this is a House Mouse image called "Heart Breaker" and he's definitely eating his way through the chocolate love heart!  I've used my Spellbinders Marvellous Squares to die cut the image and the mat which was Bazzill cardstock.  The border and corners are a Martha Stewart punch.  The sentiment was computer generated and die cut using the Marvellous Squares and sponged with DI Tumbled Glass.  Please do pop on over to the Addicted to CAS blog and see some of the amazing DT inspiration cards.  We all look forward to visiting your blogs to see your great creations.

Thanks for dropping by - have a great weekend.


Wednesday, 25 July 2012

Addicted to Stamps - Sketch Challenge #1

Hi Everyone - hope for those in the UK you are making the most of this long awaited summer weather!!!  Well, it's that time of the week for the next challenge over at Addicted to Stamps which is a Sketch challenge.

For my take on the sketch I've made up an A5 base card from black ribbed cardstock and all the mats and layers are on the black and white card.  The main image is from a Creative Expressions stamp set and I've stamped once on the white card and once on patterned paper and then paper pieced the image.  The two smaller images are from Hampton Art called Vintage Ladies and I've used the same method to paper piece them.  I've then used my Fleximarkers to colour the skin etc.  The main image and the mat have been punched using a Martha Stewart punch.  On the centre panel I have die cut the border using my Memory Box Bubble Daisy Border ...... isn't it pretty?  I've added quite a few pearls to finish off the design.

Please pop over to the Addicted to Stamps blog to look at all the inspiration the Design Team have for you.

Thanks for joining me today.

Sunday, 29 April 2012

Less is More - Week 65 - Sketch

Hello fellow bloglanders......... well, I hope you aren't having the terrible weather we are at the moment.  Gales and torrential rain ........ can hardly believe it's May next week.  Still, I suppose I don't have to tear myself away from the garden........... lol

This week's challenge over at Less is More is a Sketch:

 You may choose either of these
SKETCHES
For this card I went for a 4" square fancy edged white card blank.  I have punched the centre using my Martha Stewart Punch around the Page Caning which I've just got and couldn't wait to use!!!  I've placed a piece of cardstock behind and then stamped the sentiment from Stampin Up Always Elegant set using Shabby Shutters DI.  Will try and come back later in the week with another card but we're just off to an art exhibition preview by my friend Kaye Parmenter at East Lambrook Manor Gardens ..... methinks we will be a little soggy when we arrive!

Thanks for stopping by.

Monday, 23 April 2012

Less is More - Week 64 - Theme - How Charming

This week's theme challenge set by the lovely ladies at Less is More is How Charming and they've asked us to incorporate a charm into our card.

As I was a bit short of time I looked at what was on my desk and I just happened to have a piece of card embossed with the Sizzix embossing folder I used in my last post.  I mounted this on a copper pearlised card.  I've added a charm butterfly and a heart (which says Hand made with Love) dangling from some bakers' twine.  The centre strip is punched from a Martha Stewart deep edge punch but can't remember the name.  I do wish they'd put the names on these as I always have good intentions of writing the design name on but nearly always forget!!!  lol

Thanks for dropping by on this very, very wet and windy day down here in Somerset.


Sunday, 30 October 2011

Bah Humbug - Challenge 43 - Die Cuts

This week's challenge over at Bah Humbug is die cuts.  I've just received my Memory Box Poinsettia Wreath and matching stamp so just had to use them!  I started off with a square white card blank and die cut sage green backing paper from my stash with nesties and then put it through again with an embossing folder.  I stamped the poinsettia image and then used the die to cut it out.  This was then coloured using Promarkers with a little added Glamour Dust to the centres of the flowers.  This was mounted onto gold mirri which had again been die cut using my circles dies.  I've placed a gold ribbon across as a border and added a strip of red card punched using my Martha Stewart snowflake punch.  The sentiment has been gold embossed and I've used Spellbinders Fancy Tags 3 to die cut.  This was curved slightly and placed over the centre of the wreath using Pinflair Glue Gel.  The finishing touches are a ribbon bow and some card candy in the corners.

Thanks for dropping by.

Sunday, 28 August 2011

Bah Humbug - Challenge 34 - Here come the Girls

The lovely ladies over at Humbug Hall have set this week's challenge as Here come the Girls.  I had just got a free digistamp from Jossi Designs and she's a lovely girl in full Xmas outfit.  I printed her out onto super smooth card and coloured using Promarkers.  I then die cut the image using Labels 20 and gold inked around the edges.  I've used an A5 red card base and the backing paper is from my stash.  I used a die cut shape in red (kindly given to my by my friend Anne) and put it through my Joy in a Cuttlebug embossing folder called snowfall.  The central border is a Martha Stewart snowflake punch.  After I'd layered everything on the card I decided the main image was perhaps a wee bit too wide so scored and folded it at the sides and mounted it using double sided tape at the side and silicone glue in the centre - although I'm not sure if that shows up in the photo.  Glamour Dust has been added to all the white fur on her outfit and I've added some poinsettia flowers, gems and a ribbon to finish off.

Thanks for dropping by.

Thursday, 25 August 2011

Purple Poppies - A colour challenge - Chocolate Baroque

Glenda's just issued a challenge over on her blog which originated from beautiful poppies seeding themselves in the gravel where they park their cars.  They are such an unusual colour she has issued the challenge based on their colours.  As I've been off line all day due to problems with BT I thought I'd play along with this as the colours are gorgeous.......

I started off with the Artylicious Essence of Nature CD and printed out some background paper and a tag.  I then found some lovely circle frames which I also printed out.  I've then taken an 8x8" scalloped card blank and matted on some purple card which had the top and bottom edges punched with a Martha Stewart edge punch.  The background paper was matted onto some pewter mirri and black card and I then criss-crossed some purple ribbon over.  The main image is a Penny Black stamp called "Flying Stars" which I inked with Distress Inks and clear embossed.  I then used a Quickie Ink Pen and added glitter.  I cut out the circle frame using my EK Success circle cutter and added some acetate behind the aperture.  I used some shaker tape around the frame and added some more glitter to the image and mounted on top of the background papers.  The sentiment and tag were from the Essence of Nature CD and I then added some flowers.

Thanks for stopping by - please leave a comment as they are always appreciated.

Wednesday, 24 August 2011

Bah Humbug - Challenge 33 - Something new

This week Ann and Max over at Humbug Hall have asked us to make a Christmas card using something new.  As I had recently bought this lovely stencil from Dreamweaver I thought it was about time I used it.  I taped it onto black card using low tack masking tape and then spread embossing paste through.  I carefully lifted up the stencil and then sprinkled it with Art Glitter from the Monochromatic Brown set.  I left it to dry thoroughly and then brushed off the excess glitter (most of which attached itself to me!!!  lol).  I mounted this onto copper mirri and punched the corners with my SU ticket punch.  I then found the backing paper in my stash which went perfectly with the image.  The black border is a Martha Stewart edge punch with some copper ribbon underneath.  The corners have been punched using an EK Success photo corner punch.  The sentiment is from my SU Contempo Christmas set and fitted perfectly into my EK Success ticket punch.

Thanks for dropping in.

Sunday, 21 August 2011

Less is More - Week 29 - Things that Move


This weeks challenge over at Less is More is Things that Move. I haven't made a man's card recently so thought I would use this Stampin Up motorbike stamp. It's stamped in Black Soot DI and clear embossed. The sentiment is a digistamp. This was die cut with a labels nestie and mounted on black card. The border is a Martha Stewart edge punch and I've used some gun metal pearls to finish off.

Thanks for stopping by.

Wednesday, 20 July 2011

Bah Humbug Challenge 28 - Shapes

This week the ladies over at Humbug Towers have asked us to make a shaped Christmas card.

At the weekend we had a marvellous workshop with the lovely Jenny, our Stampin Up demonstrator, and she had done a really nice double diamond card so I decided to use this shape for my challenge card.  I began with some card I had in my stash which was cut to 12" x 5" and then I folded it to make the double diamond shape (there are lots of templates/tutorials on the net).  I matted and layered silver mirri, blue pearlised and green pearlised card and stamped and embossed a snowflake from a Stampin Up set.  The sentiment is also from a Stampin Up set and was cut out using the oval and scalloped oval SU punches.  I have also used a Martha Stewart punch to add interest to the edges of the card and a small Tonic holly punch for the embellishments on the diamonds.

Thanks for stopping by.

Friday, 20 May 2011

Bah Humbug Challenge 20 - Kinetic cards

Hi Folks - this week's challenge over at Humbug Hall is to make a kinetic card.

I decided to make my version of a circle slider card which turned out a bit like a penny slider that goes round - if that makes sense!!!  lol

I didn't have any instructions so just had a bit of a play.  I decided to use a blank CD to move the object around the main image and took a piece of card and drew around the CD.  I then cut out some card which measured twice the length so I could fold this in half to house the CD inside.  Still working on the inside of the card I decided how far in I wanted the circle slide part of the card to be.  I actually used my EK Success Circle Scissor to cut this out - it made life so much easier and you get a perfectly clean cut.  I then used a SU circle punch to cut out the finger hole at the side to enable you to "slide" the CD around.  The white and green snowflake card was in my stash and I'm not sure where it came from.  For the main image I die cut two shapes with my nesties and used a snowflake image from the SU Serene Snowflake set.  I stamped it with Versamark and heat embossed in white glittery e/p.  The slider part is a digi sentiment which I punched out using a SU punch.  I cut some d/s foam pads to size and placed them on the CD through the aperture making sure they didn't foul the card and then added the sentiment.  I popped on a snowflake from a Martha Stewart punch and added some gems.  The whole piece was then mounted onto a square card blank so I could put an insert inside.

Hope my explanation was clear enough but feel free to email if you want clarification.

Thanks for stopping by.

Monday, 25 April 2011

Bah Humbug Challenge 16 - The man himself - Santa Claus

This week's challenge over at Humbugger Hall is Santa Claus.  As I saw that my friend Anne used the same Santa Claus image that I had in mind so then had to go hunting round for something suitable.

When I came across this stamp I thought what better than one Santa Claus - well, yes, four Santa Claus'!!!  lol  This stamp is from Crafty Individuals and features four images of the man himself in different poses - mind you I think they are four different people posing..................  I stamped using Memento ink and then coloured using Promarkers which was quite difficult as the stamp is quite dense in colour.  I then cut the image into four and backed with red mirri and then white card.  I edged a piece of red mirri using my MS snowflake punch.  The sentiment is from a clear stamp set but I don't know where it comes from.  It has been stamped onto white card and matted onto red mirri.  The stars are the waste from the MS snowflake edger punch.  The backing papers are from the Papermania Classic Christmas set.  The photo corners are an EK Success punch; the large snowflake is also a MS punch.  I decided on an easel card but cut it off centre so one side was for the main image and the other for the sentiment.  I also made the two stoppers at different levels to give more interest.

Thanks for stopping by and I hope everyone has had an eggstremely good Easter!!!  lol

Sunday, 24 April 2011

Do It With Digis - Fairies, Pixies and Elves

The latest challenge over at Do it with Digis is Fairies, Pixies and Elves.  I had to hunt around all my digi images to come up with something nice for this card and I found a lovely mushroom house and a baby which I think looks remarkably like a pixie.  Unfortunately I don't know where either of them came from and I do wish that artists would actually include their name on the downloadable images.

I first copied and pasted the two images into Word and then printed them out.  I have used a set of nesties to die cut the image leaving the little pixie outside the frame.  I left the images inside the die and sponged some Shabby Shutters Distress Ink around the edge.  This was then coloured in using Promarkers and matted onto the larger size die cut.  I printed out the mushroom house again and cut out the image leaving the negative space which I then sprayed Crafters Companion Spray and Sparkle Iridescent through.  Unfortunately when I looked at the photo this spray doesn't show up very well at all which is a shame.  The backing papers and border strip are from NitWit Collections Cotton Candy Kisses which was a free giveaway with a magazine and I joined the two pieces with a border strip of bazzill card punched with Martha Stewart Wild Flowers deep edger punch.  I added a button and ribbon bow.  The sentiment comes from Crafts4fun.nl and I used my Stampin Up oval and scalloped oval punches.

Wednesday, 13 April 2011

St Luke's Charity Challenge - Say it with Flowers

This is the first challenge from a brand new blog called St Luke's Charity Cards.  St Luke's is a hospice which cares for people aged 18 and above throughout Sheffield who have incurable illnesses. Their aim is always to control the patients symptoms, alleviate pain, and give them the best possible quality of life – all free of charge. It costs £6 million per annum to keep St Luke's open, and government funding, via NHS trusts only provides one third of the funds required, which means the Hospice has to raise a staggering £4 million each year to provide this vital end-of-life care.

They have been very kind with their first challenge which is "Say it with Flowers".  I have been making sample cards for our club night tonight and have used used my Stampin Up One of a Kind stamp set.  On a blank piece of white card I have stamped the flowers and then decoupaged them.  I also stamped single flowers to make the background.  I have used backing paper from my stash and also for the piece representing the ground.  In the top corners I have used my Martha Stewart deep corner punch - Wild Flowers.  The sentiment is from the same stamp set which says "for you" (unfortunately it isn't clear in the photo) cut out using the SU oval and scalloped oval punches and set upon a nestie die cut.  I then added some Stickles glue to the centre of the flowers and added stems using Promarkers.

Thanks for stopping by.

Sunday, 3 April 2011

Less is More - Colour Challenge "A Touch of Red"

This week's challenge over at Less is More is A Touch of Red.

I am in the middle of doing samples for our next craft club night where we are having a Stampin Up evening so thought this was an ideal opportunity to not only make a sample but to do it on the lines of the LIM challenge.


I have taken a blank DL card and stamped the flower from A Touch of Nature stamp set using Memento ink.  I then stamped it again on a piece of post-it note, to create a mask, and cut out the image.  I then cut an aperture in a sheet of copy paper using a nestie and attached it to my card, centering it over the flower over which I had placed the mask.  I then inked up the French text background stamp with Memento ink and stamped through the aperture.  I coloured the flower with Promarkers.  The sentiment is from the Wonderful Words stamp set.  To finish off I punched the four edges of the card using my Martha Stewart corner punch.

Thanks for stopping by.

Sunday, 20 March 2011

Less is More - Week 7 Challenge - Masculine

This weeks challenge over at Less is More is Masculine.

I decided to use this stamp from Lili of the Valley called zooming along and stamped onto white card with Memento ink and coloured with Promarkers.  I decided to try the "inside the box" technique that I saw Sue Wilson doing on C&C the other day.  I frequently use the "outside the box" method but hadn't thought of doing it this way round.  I took the nestie I wanted to use and positioned it on the card where I wanted the aperture.  I then lightly pencilled around the inside of the die and cut out the part of the image which was inside this mark.  I then positioned the die (cut side down) under the part of the image I had just cut out.  This gives the impression of the car being within the window.  I positioned some paper from my stash at the back of the window.  Now I know the challenge is definitely less is more but it did look pretty plain at this stage so I ran the piece of card through my die cutting machine in a Creative Expressions embossing folder and then inked lighly over the raised area.  The edge was cut using a Martha Steward punch.  Sentiment is from a Stampin Up kit and cut out using Stampin Up punches.

Thanks to all for stopping by on this beautiful sunny spring day.