Followers

Saturday, 28 February 2015

Carried away with CAS(E) this Sketch Challenge # 112

There's a new challenge over at CAS(E) this Sketch and I had a bit of a play yesterday and made not one, not two but THREE cards!!!!  Here is the sketch:


and here are my cards:


For the first one  I have used my Sue Wilson Expressions Die - Enjoy.  I used a combination of blue mirri and a light green cardstock and die cut the sentiment.  I then played with adding (paper piecing) the die cut sentiment back into the negative aperture in different colours.  The sentiment was added to complete the card and I mounted it on a piece of dark green card.  Sorry I don't know the make of the sentiment stamp but think it came free with a magazine.


For the second card I used Tonic partner sentiments die set and used a combination of plain red cardstock, embossed red cardstock and some glitter card (although I don't think it shows up very well in the photo).  I added the heart which came out of the sentiment to the top of the card.


For my third, and last, card I have used my Memory Box Grand Happy Birthday die - very simply cutting it out of cream card and laying a piece of d/p behind it.  I added some gold gems and that was the card finished.


Thanks for popping by.  Hope you're having a great weekend.

Happy crafting.


Tuesday, 24 February 2015

CAS.ology Week 135 Mini

Ardyth's latest blog post just popped into my inbox and when I saw what the challenge was over at CAS.ology then I wanted to join in!!!

The challenge for this week is:


So, a super quick card from me.   


I printed out this sweet bee image from Colorink, added some Wink of Stella on the flower and eyes and some Glamour Dust on the wings.  I die cut the image using my Lil' Inker stitched square dies.  Then I cut two "happy" sentiments (Tattered Lace) - one in black and the other in a yellowy orange and slightly offset them.  I then embossed a larger stitched die on the base card and popped the image and sentiment in the embossed square.

Why don't you pop on over to the CAS.ology blog to see the fun cards the DT have created.

Thanks for coming by today.

Happy crafting.


Monday, 23 February 2015

CAS(E) this Sketch #111

Hi everyone.  Hope you all had a great weekend.  Weather here in Somerset was not brilliant with lots of rain and wind but intersperced with some sunshine and blue skies.

Thought I'd pop by to show you the card I've made to enter the latest CASE(E) this Sketch challenge.  

Here is the sketch:


As you can see from my card I switched the sketch around and came up with this:


There is also time to enter this card into Addicted to CAS Challenge #57 where the code word is MASK.


I stamped the flower from my Clearly Besotted  Friends Forever set using Versamark and then white embossed it.  I have the matching set of dies to go with this stamp set so I cut a mask for the flower and then I die cut another mask using a Die-namics Pierced ovals die.  I placed the flower mask over the stamped image and secured the negative of the oval die mask over the whole piece.  I then inked and stamped my SU En Francais to give a background to the flower whilst leaving an oval edge.  This was then die cut using the Die-namics oval die and I left that in place and sponged over some colour.  I've used the same set of dies for my sentiment which is from SU Ovals All (luckily they fit perfectly) and die cut two banners with the Die-namics Banner dies using b/p from my stash.  I then added some faux pearls using Liquid Pearls (they look really dark but are, in fact, green).

Thanks for popping by.

Happy crafting.


Wednesday, 18 February 2015

Embossing and one layer LOVE and a little bit of masking

Afternoon all from a lovely sunny Somerset - still chilly but it makes you feel good seeing the sunshine and blue skies.

So today I have one card which fits three challenges that are on at the moment.  The first is Happy Little Stampers February challenge - Embossing and the second is Less is More - One Layer Challenge Week 211 with the theme of Love and the third one is Addicted to CAS challenge #57 where the theme is MASK

Here is what I came up with:


I took a DL card blank and ran it through my Big Shot with two sizes of the SU Framelets Labels collection - I used the bottom plate of the multi platform with a base plate, card blank with the Framelets positioned (with the cutting blades facing UP), placed my foam mat over and then the cutting plate and ran it through the machine.  This way gives a lovely embossed impression rather than cutting the cardstock.  I then used my SU Love & Laughter stamp set and used my Versamark ink pad to stamp the dress and heart and one of the sentiments.  I then heat embossed the images with detail gold embossing powder.  I cut two masks to protect the outside of the embossed framelet shapes and sponged SU Daffodil Delight ink around the edges and the edges of the DL card as well.  Final touch was a bow.

So hopefully this fits in with all three challenges - embossing two ways......with dies and heat embossing; one layer with the theme of love (wedding) and masking so I could colour around the inside of the embossed framelet shapes.

Sorry for the picture quality but ended up having to scan it as no matter what I did when I photographed the card it either didn't show up the gold embossing or was too dark/light!!!  Frustrating.  Still at least you've got the picture!


Thanks for stopping by.

Happy crafting.


Monday, 16 February 2015

CAS(E) this Sketch # 110

There's a new sketch challenge over at CAS(E) this Sketch.  Here is the sketch:


As soon as I saw it I knew what I wanted to do and here is my card:


Such a simple card to put together - I used my Papertrey Ink Circle Scribbles die set and also their sentiment die.  I cut one each of the circle scribbles in pearlised cardstock and overlapped them on the 5x7 card and trimmed off the edges.  I then die cut the sentiment, first in white glitter card (which didn't show up as well as I had hoped) and then in black mirri and I slightly off set them.  Lastly I stamped "wishes" from my Clearly Besotted Say it in Style stamp set and that was it!!!  Hope you like it - I was really pleased with the outcome and thought it would make a nice male card.

Happy crafting.


Friday, 13 February 2015

Less is More Celebrating 4 years

Hello everyone from a very wet and windy Somerset!!!  Well I'm just in the nick of time to join in the fun at Less is More this week.  Just can't believe Chrissie and Mandi started up this blog 4 years ago - it only seems like yesterday.  Sadly I don't seem to have as much time to join in these days but just had to do a card for this special week.  Here are the criteria:

As it is the first Challenge of the month it's a 
Colour Challenge 
and this time they are
PINK AND GREY


And here is my card:


I've used some d/p and ribbon from my stash.  Then I stamped Falling Flowers (Honey Doo Crafts) in Memento London Fog on the bottom of my piece of card, coloured with Chameleon pens and then added Platinum Liquid Pearl dots to the design.  The sentiment is from Clearly Besotted Say it in Style stamp set cut using an EK Success label punch.

For some reason although the ribbon is a very similar pink to the rest of the card it has shown up slightly peachy in the photo!!!

Hope you all have a great weekend whatever you're doing.

Happy crafting.


Saturday, 7 February 2015

Runway Inspired Challenge #77 - Jenny Packham..........two cards and TIME OUT #24

There's a great challenge over at Runway Inspired Challenge.    There's also a new challenge at TIME OUT  which is to CASE the lovely card made by my good blog friend Kylie of Kylie is Addicted to Stamps & More.  Below are the two inspiration photos:


                                         KYLIE'S CASE CARD


I thought the colours and style of this dress were lovely so I set about making my card.

I know what was in my head (normally not much!!! lol) but it didn't translate very well IRL.  I started off by die cutting my Die-namics Sun Ray die in blue cardstock and backed it with a piece of grey card which I'd embossed using Craft Concepts Stained Glass e/f.  I cut the two chevron strips (Die-namics Chevron Stripes) and then die cut three Memory Box Hibiscus Flowers.  The sentiment is Stampin Up Apothecary Art and I stamped it around the sun ray die.  Here is the card put together:


As I said, I don't think it translated to completed card at all well.  I thought I'd have another go today and I was much more pleased with the outcome.  This is the card that fits in with the TIME OUT challenge.  Here it is:


I started off by taking a copy of the photo of the dress into CraftArtist and cropping it so I could make it into a background.  I then printed it off so I could use it as a base layer of my card.  I then stamped Clearly Besotted Fresh Flowers onto a die cut tag (Sue Wilson's Pierced Tags) and coloured in using my Chameleon pens and added some Wink of Stella Clear on top of the flowers.  I sponged around the edges of the tag with SU Baja Breeze.  I die cut a smaller tag and stamped a greeting from Clearly Besotted Say it in Style set and again sponged the edges.  I used the Die-namics Chevron Stripes again across the centre of the card but this time layed the smaller one on top of the larger.  I added some flowers from my stash, the leaves are Britannia Dies Leaf Flourish and the photo corners are an EK Success punch.

As I say I was much more pleased with this card.  Pop on over to the RIC blog and have a look at the lovely DT cards.  There's a great prize for the winner!  Don't forget to go over to the TIME OUT challenge blog to see all the great inspiration from the DT.

Have a great weekend.

Happy crafting.


Pony CASE-Express

The Pony CASE-Press


Hi Everyone - just thought I'd steer you in the direction of a brand new challenge, which is certainly a bit different, and run by the uber talented Mynn Kitchen of On A Stampage.  The concept is to join in the challenge and you will be placed in a queue, you will then CASe the card before you in the queue and then mail your card to the person whose card you've just CASed.  So you need to be up for posting cards internationally!  You can enter your name to join in the fun as many times as you like.

Pop on over to Mynn's blog and have a look at how it works and the rules of the challenge - it really sounds like fun and I can't wait to join in.

Happy crafting.


Thursday, 5 February 2015

Less is More - Lucky Dip Week

Hi Everyone

It's Lucky Dip Week over at Less is More and the theme is "Little Ones" and you may interpret this in any way you choose... babies, children, small elements on your card... whatever your imagination dictates.

I decided to go for a baby card and here is what I made:


I've used the stork and bundle from my Little B Baby die set and coloured using Promarkers. The die cut words are Tattered Lace and I've used Lil'Inkers Stitched Squares for the mats.  As I'd used the largest of these dies for my last mat - and I wanted a stitched design on my base card - I used the straight stitched die from my Paper Smooches Stitched die set.

For some reason the base card looks cream in the photo but it's definitely white although it's pearl white, so maybe that's why it's showing up differently to the other white card.  Looks fine IRL!!!!

So glad you popped by - hope you're all having a good week and looking forward to the weekend.

Happy crafting.


Wednesday, 4 February 2015

One-Layer Simplicity Challenge OLS13: You Blend!

Afternoon all.  I was having a wander round blogland yesterday and came across a tutorial for Bokeh. I've seen quite a bit about this recently so thought I'd give it a try.  When I finished I realised it fitted the OLS challenge very well.  Here's what I came up with:


I chose two colours - SU More Mustard and Mellow Moss and sponged and blended the colours onto a piece of white cardstock.  Set aside to dry and then punched some different sized circles out of another piece of card to use as a template.  I then placed the circle template over my coloured background and sponged SU Whisper White ink through the apertures.  Now you've got your panel sorted you just need to make it up into the finished card.  I added some die cut sequins, the sentiment is SU Wetlands and the label punch is SU as well.  Finished touches were the addition of some bakers' twine and then matted and layered it up on cardstock from my stash.

Thanks for dropping by.

Happy crafting.


Tuesday, 3 February 2015

Happy Little Stampers February Sketch challenge & Showcase your Style


Hello to all my friends, followers and fellow bloggers.  Thanks for dropping by today.

A really quick card today to enter into the Happy Little Stampers February Sketch challenge.  Here is the sketch:


I thought it was so pretty that the temptation was to actually recreate it!!!  But I think that defeats the point..............so here is what I came up with:


I started off with a blank 5 x 7 card and using Memento London Fog stamped Stampin Up Off the Grid stamp and then over stamped with three different Paper Artsy Mini grunge stamps.  I then die cut two mini and one normal Memory Box hot air balloons out of d/p from my stash.  Popped them up with silicone and then stamped the sentiment from Sheena Douglass's A Little Bit Sketchy Only Words - From the Heart using SU Pumpkin Pie ink.

This also fits with the Showcase your Style challenge.  Thanks for the heads up Dippy. Here is their challenge photo:


Have a great day.

Happy crafting.


Monday, 2 February 2015

CASE-ing Christmas: Challenge #5

Hello everyone from a very cold Somerset..........winter thermals, socks and hats weather, that's for sure.  Still, at least we're not snowed in as some people are so we should be grateful for that.

Thought I'd join in the fun over at CASE-ing Christmas - here is the card that Mynn has chosen to CAS(e):


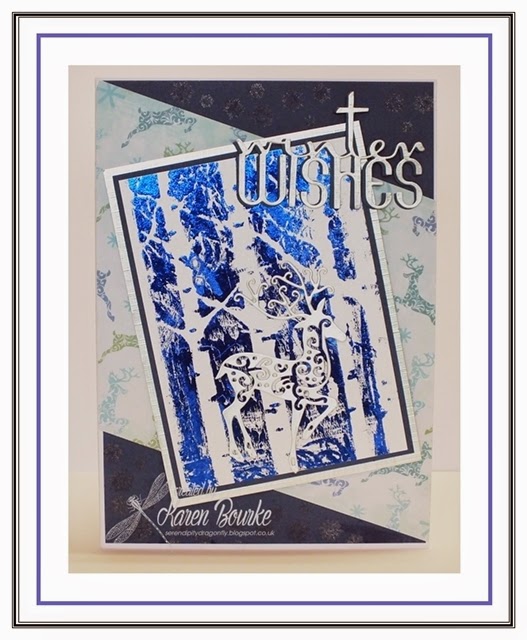
As soon as I saw the birch trees that Mynn had stamped on her card I immediately thought of my Memory Box Garden Birch Trees stencil and as I had just been watching Julie Fei-Fan Balzer's video tutorial on using rubber cement and foils with stencils I thought I'd play along.  This is what I came up with:


Firstly I placed the stencil over a piece of white cardstock and used the rubber cement brush to cover it with the cement.  I then took off the stencil and washed it clean.  The rubber cement is so thick that it stays exactly where you put it and so doesn't run under the stencil.  As soon as it goes slightly opaque it is dry.  I then took some navy transfer foil and placed it dull side down over the rubber cement and used my bone folder to rub over to make sure the foil was in contact with the cement. When you're happy with the result remove the foil and then you can make up your card - I matted and layered onto navy and silver cardstock.  I adhered a blue cardstock layer to the base card and found a scrap of Christmas paper which was placed at a "jaunty" angle (!!!).  I added my topper, a die cut reindeer (Tattered Lace) and a drop shadow sentiment which is a Penny Black die.

Thanks for popping by and taking the trouble to wander round.

Happy crafting.