Followers

Sunday 29 March 2015

By the skin of my teeth.................Happy Little Stampers challenges

Happy Sunday from a very wet and windy Somerset!  Seems like most of the UK is receiving similar weather - so good news for us crafters eh?

Whilst I was making my card for the City Crafter challenge that I was reminded of the March challenges over at Happy Little Stampers.  The first is a sketch challenge and the second is sponging.


Hopefully I've managed to combine both challenges in one card!  


I started off by sponging some SU inks onto a piece of cardstock.  I then used an IndigoBlu stamp (freebie with a magazine) using SU Not quite Navy and heat embossed it with Judikins Iridescent Sparkle e/p (which I don't think is showing up at all in the photo).  The sentiment is a Waltzingmouse sentiment stamp......... unfortunately they don't put a title of the set on the packet; and stamped and embossed as above.  I matted onto a piece of navy cardstock and then onto a prescored card.

Thanks for stopping to have a look round.

Happy crafting.


Friday 27 March 2015

City Crafter Challenge - Go Ombre!

Hi all - well I've been inspired by my friend Darnell of djkardkreations to join in the fun over at City Crafter Challenge Blog where the theme is:

Go Ombre
Here's what I've done.


I used Sue Wilson's Beaded Fanfare e/f for the bottom layer - this range of her e/f's are gorgeous and give such a deep impression.  The next two layers are die cut with Go Kreate XXL Frilly Frames.  For the main topper I used my Sue Wilson Greek Island background die and added a piece of acetate behind the windows.  I then used various shades of blue/aqua SU mini ink pads to sponge the colour over a separate piece of linen cardstock and I also sponged around the topper (although this doesn't show up very well in the photo).  

Being totally inspired by Darnell I decided to create a shaker card - it's been ages since I've done one - so I put 3D foam around the underside of the window, added some tiny beads in shades of blue and placed my die cut on top.  I've used Sue Wilson's Trailing Ivy for some added detail and the frame/tag comes from her Greek Island Collection.  The sentiment is SU Oval All and the final addition is a bow.

Thanks for popping by.  Hope you all have a great weekend.....although the weather here in Somerset doesn't look very nice at all - but that just gives me a good excuse to stay in crafting!!! lol

Happy crafting.


Sunday 22 March 2015

DJKardkreations, Less is More, Happy Little Stampers, Just Us Girls & Time Out!!!

Hope you're all having a great weekend.  The sun is shining down here in Somerset which is lovely.

My great friend Darnell has a NBUS challenge on her blog (acronym for "never-before-used schtuff"),  Less is More have a CASE a DT card, Happy Little Stampers have a sketch challenge, Just Us Girls have a colour challenge - black, white and a colour of your choice and lastly TIME OUT also has a black, white and a splash of one colour challenge.........so I'm entering my card into all of these challenges.  Whoopie - 5 in one go!

First of all I've used my new stamp set SU Big Day which was a freebie with my last order - so that's the NBUS bit; I chose to CASE Chrissie's card which is black, white and red (see below);  Happy Little Stampers sketch is below as are details of Just Us Girls and the TIME OUT challenge is:
 
Clean and Simple

 with the optional twist of:

Black and White plus a Splash of One Colour. 

     
And here is my card:
 
 
A very simple card to make.  I stamped the cake three times across the bottom of the card and coloured the centre cake and the flames with my Akashiya Sai Watercolor Brush Pens.  I then die cut the piece using my Lil'Inker stitched dies.  The sentiment was stamped and the "cake" coloured to match the rest of the card and then cut out and mounted on foam pads.  And that was it - very quick and simple.
 
Thanks for dropping in today.  Please pop on over to the blogs to see all the challenges and maybe join in the fun.
 
Happy crafting.


Saturday 21 March 2015

The Pony CASE-Press

Happy Saturday everyone.  Well I've been waiting to show you this card but had to be patient as it was sent to Mynn over in Canada and I didn't want to spoil her surprise.......unfortunately a lot of mail got caught up in the bad weather in the US so it took an extra loooooong time!

I'm not sure you remember what the Pony CASE-Press is all about but here's a summary:

Here's how this works:
  1. The person wishing to participate will contact me, Mynn, at onastampageATyahooDOTcom with their mailing address and be placed in the queue line and will be emailed a personalized watermark to use on the photo of the card they create for this challenge.
  2. Mynn will email the participant when it is his/her time to craft and send out a picture of the card they will CASE with the recipient's mailing address.
  3. The participant will look at the card that the participant before them created, CASE it, and then send it to the person who inspired them. The participant will also send Mynn a photo of their creation to be put on the queue as soon as the recipient receives it.
There are a few rules:
  1. Only sign up if you are willing to ship a card internationally.  This concept will be open world wide as another way to build a fun and friendly online community for crafters.
  2. Please be timely in making and sending your creation.  Because this is an international chain, cards need to be made and sent within a week of receiving the email from Mynn so that we can keep things moving along. 
  3. Please make sure to use the Pony CASE-Press watermark on the photo of your card.  If you need help with this, email Mynn and she will do it for you! :)
  4. After you sign up to participate, please add our badge to your sidebar so that others can find us!
  5. You will need to make sure NOT to blog your card until the recipient receives it. 
  6. HAVE FUN!
And now onto my creation.  I was tasked with CASEing Mynn's card which, in turn, CASEd Petra's original card:

             Petra's card                                                                                  Mynn's card


and now for my card:


For the various elements of backing paper I used docrafts Papermania Madame Payraud's paper pack which has a lovely range of eclectic papers.  These were cut and layered onto plain card and I used my sewing machine with a variety of straight and zigzag stitching to attach the panels.  I used some lace and flowers from my stash.  The banner is Die-namics Fishtail Flags.  


On the main panel I die cut some copper sheet using Tattered Lace Doves & Branches and then heated the copper to change the colour.  The die cut leaves I found in my bits box and asdded some WOW Metallic Copper Ultra High embossing powder.  Added a bow, the little birds are from Impression Obsession Die 154-A and the final touch was some Liquid Pearls.

The next card will be a CASE of my card to Mynn and so it goes on - it's great fun so why don't you pop on over to Mynn's blog and join in.

Happy crafting.


Friday 20 March 2015

LIM - One Layer Week

Hi Everyone - well, did you see the eclipse this morning?  Didn't think we were going to down here in Somerset as it was extremely cloudy but a small window appeared eventually where you could see the sun eclipsed by about two thirds.  Must admit it didn't get as dark as I thought it would.

Anyway, onto the business in hand.  I'm just getting into the new LIM challenge by the skin of my teeth - is that a weird saying or what????  So it's a one layer challenge with the subject of including an animal.  Come and see what I made.


I've been wanting an excuse to use this Tim Holtz Crazy Birds set for a while now and this seemed the perfect opportunity.  I stamped the bird using Stazon and then watercoloured him using my Akashiya Sai Watercolor Brush Pens which are fabulous to use.  If you're interested check out the Kristina Werner YouTube video on them https://www.youtube.com/watch?v=4e-Snj8Ul78&feature=em-uploademail.  The sentiment is from my Wplus9 Unforgettable stamp set.  

Now Chrissie at LIM carried out a survey recently on what one layer meant to everyone and, as a result of that, have changed the guidelines slightly as follows:

On the subject of using inlaid dies, we have decided that it will be acceptable if the whole of the front of the card is simply backed by an inner lining! We deemed this to be much more aesthetically pleasing than a piece of stickytape on the inside of the card to keep the bits from falling out!

As for embellishments... they must be just that... embellishments and not a main feature of the design. They must be small and add to the design and not form the majority of it!
So, how could I not add an embellishment which adds to the design - my googlie eyes!  They just seem to make my bird come alive...........

I'm also entering this card into the AAA Cards challenge which is:

Game #35 Bare Naked CAS

Thanks for dropping by and any comments you may wish to make.  Hope you all have a wonderful weekend.
Happy crafting.


Thursday 12 March 2015

One for two...........

Just a quick post this afternoon to show you a card I made that fits with two challenges.  The first is Freshly Made Sketches #177 and the second is Retro sketches #156.  Here are the two sketches:


And here is my card:


I started off die cutting some circle scribbles, from my Papertrey Ink set, from some d/p in my stash.  I cut a small border piece from the same paper and put a piece of ribbon down the length.  The orchid is Spellbinders D-Lites Orchid coloured with Promarkers with an added touch of Wink of Stella.  The banner is Die-namics and the sentiment was one I had spare from the SU workshop on Saturday.  Final touches are sequin die cuts from Die-namics.

Thanks for dropping by.

Happy crafting.


Wednesday 11 March 2015

Lego, Lego and even more Lego

Just a quick post today to show you the card I made my great nephew Charlie for his 3rd birthday yesterday.


I started off by embossing red, green, blue and yellow cardstock using my Embossalicious Grande Dots e/f.  I realised quite soon on that it was difficult to then cut down the cardstock without squashing the embossed dots, so started off again by cutting the cardstock to the width I wanted and then embossing - this worked much better!  I matted the Lego bricks onto some black cardstock and then cut that to size/shape and used Mod Podge over all the bricks.  When that was dry I then put Glossy Accents on all the raised dots to give them real dimension.  The die cut "happy" is Clearly Besotted, the "birthday" is Papertrey Ink and the alphabet for Charlie's name is Tattered Lace Elegant Alphabet.  The banner is Die-namics Fishtail Flags.  The number 3 is computer generated and cut out.

All the family met up for lunch just outside Southampton and it was such a lovely day.............Charlie was in great form (and the adults weren't too shabby either!).  It was lovely seeing them all and catching up with news.

Happy crafting.


Tuesday 10 March 2015

CAS(E) this Sketch #113

Hi Everyone

Just a quick post before driving down to Southampton to celebrate my great nephew Charlie's 3rd birthday.

CAS(E) this Sketch have a new challenge.  Here is the sketch:


Here is my card:


I stamped the bluebell stem from Clearly Besotted's Fresh Flowers set and used the matching dies to cut it out.  I coloured using Imagination Crafts Vintage Pearly paints.  The mat is die cut using Die-namics stitched rectangles.  I added three pieces of ribbon in a matching colour and the sentiment (from a free set) was stamped using Versafine Purple ink and cut out using an EK Success label punch.

Thanks for dropping by today.  Your comments are always very welcome.

Happy crafting.


Sunday 8 March 2015

Stampin Up Extravaganza

Just popping by to show you some photos of the projects we made yesterday with the lovely Jenny who is just amazing.......and boy does she make us work!!!   Here's what we made.

Main project was this lovely clock (working) with some various cards

A lovely card
The inside of the balloon card.

One more card and a little handbag that Jenny made for everyone - with a Ferraro Rocher chocolate inside!

Hope you're all having a great weekend.

Happy crafting.


Friday 6 March 2015

70th Birthday card

Hi Everyone from a very sunny Somerset........makes a change but it's a lovely day today; blue skies, sunshine wall to wall and a light breeze.  Hope some of you are also enjoying this spring like weather.

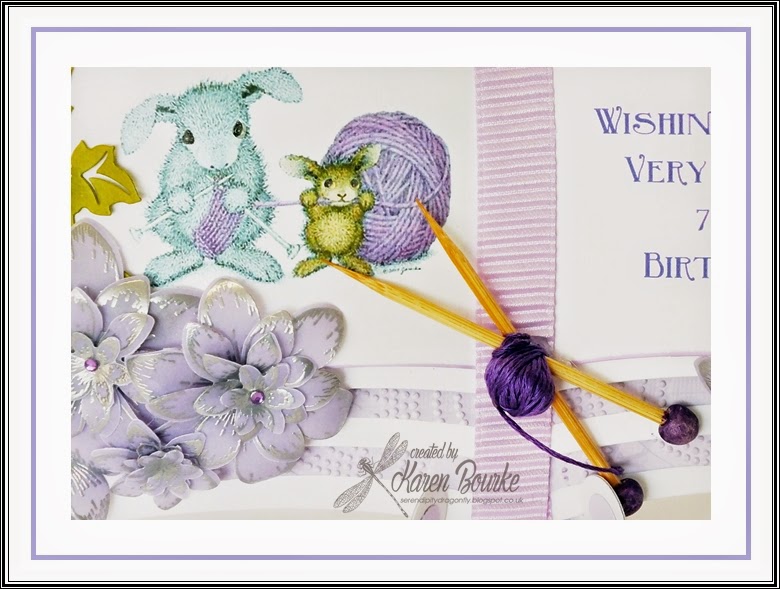
I recently had a commission for a 70th birthday card for a lady who loves flowers and knitting!!!  Okaaay............well, this is what I came up with.


I found an old House Mouse image which was perfect for this card and who doesn't love House Mouse.  I started off by die-cutting the main pages for the book and embossed the lilac layers with my Sue Wilson Beaded Fanfare embossing folder.  I've used Sue Wilson's ivy die and the flowers are Heartfelt Creations Sun Kissed Fleur silver embossed onto lilac vellum and then die cut with the matching die.  The beaded pins are from my stash, as are the gems in the flowers and the ribbon.  The sentiment was computer generated.


I made the knitting needles from some wooden skewers, cut them down and made the ends from air dried clay painted with violet Wink of Stella.  I used some embroidery skein for the ball of wool.  The 70th and her name (Eira) were die cut using Spellbinders.  I've made a pocket using the smallest book page die which I've put onto the back of the card with a tag for the greeting.


I made a stand for the book using a Marianne Creatables LR0266 - three layers of cardstock glued together and then the lilac card for the filigree layer front and back.  This might sound like it's quite bulky but it needs to be quite weighty to hold the card in place.  I finished off by making a box for it.

Thanks for dropping by today.  I'm off to a Stampin Up workshop tomorrow so hopefully will post some photos on Sunday.

Happy crafting.