Followers

Wednesday, 31 August 2011

Take 3 and Faux Postage Challenges

This week Mandi and Chrissie over at Less is More have given us a recipe challenge as follows
Take 3 Challenges
We want you to choose 3 from any of our previous 29 and combine them in your design.
I am also going to enter this into the challenge over at Rainbow Lady where Chocolate Baroque are sponsoring a Faux Postage challenge.

Now giving us a challenge is fine but expecting us to choose three out of the last 29 challenges goes a bit far!!!  lol  For my card I have chosen Week 4 Three Squares, Week 15 Embossing and Week 19 In the Frame.
I've taken an A5 card blank and stamped my Judikins Square Postage Frame.  I then masked off the outside, punched a circle for the sun/moon and then brayered using Big & Juicy Foliage.  I removed the punched circle and then moved onto the other two postage frames in turn.  I then inked up my Judikins African Safari cube stamp and stamped an image inside each of the frames.  To finish the card off I used my Hougie Board to add some embossed lines.

Thanks for dropping in.

Sunday, 28 August 2011

Bah Humbug - Challenge 34 - Here come the Girls

The lovely ladies over at Humbug Hall have set this week's challenge as Here come the Girls.  I had just got a free digistamp from Jossi Designs and she's a lovely girl in full Xmas outfit.  I printed her out onto super smooth card and coloured using Promarkers.  I then die cut the image using Labels 20 and gold inked around the edges.  I've used an A5 red card base and the backing paper is from my stash.  I used a die cut shape in red (kindly given to my by my friend Anne) and put it through my Joy in a Cuttlebug embossing folder called snowfall.  The central border is a Martha Stewart snowflake punch.  After I'd layered everything on the card I decided the main image was perhaps a wee bit too wide so scored and folded it at the sides and mounted it using double sided tape at the side and silicone glue in the centre - although I'm not sure if that shows up in the photo.  Glamour Dust has been added to all the white fur on her outfit and I've added some poinsettia flowers, gems and a ribbon to finish off.

Thanks for dropping by.

Saturday, 27 August 2011

Congratulations

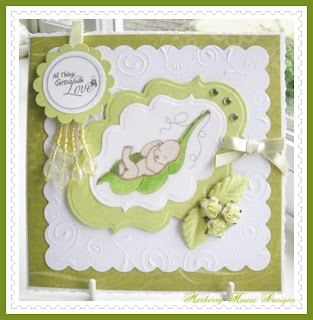
I've just had the wonderful news that my youngest nephew, Keir, and his wife, Lara, are expecting their first baby. As you can imagine they are over the moon (as is my sister!!!). I thought I'd send them a card congratulating them on their achievement.........

Both the image and sentiment are digi stamps.  Keir was trying to explain to me that the scan of the baby looked like a peanut in it's shell I thought this image of the baby in the pea pod was pretty appropriate.  They don't know the sex of the baby so I have played safe and used a white and green palette.   The background paper and white embossed frame are from my stash, as are the papers, dangling gems and flowers and I've used my Nellie Snellen embossing punches to make the leaves.  Added some gems and ribbon and the card was finished.

Thursday, 25 August 2011

Purple Poppies - A colour challenge - Chocolate Baroque

Glenda's just issued a challenge over on her blog which originated from beautiful poppies seeding themselves in the gravel where they park their cars.  They are such an unusual colour she has issued the challenge based on their colours.  As I've been off line all day due to problems with BT I thought I'd play along with this as the colours are gorgeous.......

I started off with the Artylicious Essence of Nature CD and printed out some background paper and a tag.  I then found some lovely circle frames which I also printed out.  I've then taken an 8x8" scalloped card blank and matted on some purple card which had the top and bottom edges punched with a Martha Stewart edge punch.  The background paper was matted onto some pewter mirri and black card and I then criss-crossed some purple ribbon over.  The main image is a Penny Black stamp called "Flying Stars" which I inked with Distress Inks and clear embossed.  I then used a Quickie Ink Pen and added glitter.  I cut out the circle frame using my EK Success circle cutter and added some acetate behind the aperture.  I used some shaker tape around the frame and added some more glitter to the image and mounted on top of the background papers.  The sentiment and tag were from the Essence of Nature CD and I then added some flowers.

Thanks for stopping by - please leave a comment as they are always appreciated.

Wednesday, 24 August 2011

Bah Humbug - Challenge 33 - Something new

This week Ann and Max over at Humbug Hall have asked us to make a Christmas card using something new.  As I had recently bought this lovely stencil from Dreamweaver I thought it was about time I used it.  I taped it onto black card using low tack masking tape and then spread embossing paste through.  I carefully lifted up the stencil and then sprinkled it with Art Glitter from the Monochromatic Brown set.  I left it to dry thoroughly and then brushed off the excess glitter (most of which attached itself to me!!!  lol).  I mounted this onto copper mirri and punched the corners with my SU ticket punch.  I then found the backing paper in my stash which went perfectly with the image.  The black border is a Martha Stewart edge punch with some copper ribbon underneath.  The corners have been punched using an EK Success photo corner punch.  The sentiment is from my SU Contempo Christmas set and fitted perfectly into my EK Success ticket punch.

Thanks for dropping in.

Tuesday, 23 August 2011

DYSU Challenge - Thank You

The challenge over at DYSU is Thank You  and as I had to make a thank you card for some friends who hosted a party on Saturday.  I started off embossing a piece of white linen card using a Crafts Too butterfly folder.  I then cut this out around the image, inked it with Distress Inks and then sprayed with iridescent Crafters Companion spray.  I tied some purple ribbon around a 6x6" card blank and then stuck the embossed panel on the left hand side.  I die cut some butterflies out of pearlescent and mirri card using my Stampin Up Beautiful Butterflies embosslit and added them to the card.  The final touch was the sentiment (again SU) which I cut out using a Stampin Up scalloped square punch and added some gems.

Thanks for stopping by.

Sunday, 21 August 2011

Less is More - Week 29 - Things that Move


This weeks challenge over at Less is More is Things that Move. I haven't made a man's card recently so thought I would use this Stampin Up motorbike stamp. It's stamped in Black Soot DI and clear embossed. The sentiment is a digistamp. This was die cut with a labels nestie and mounted on black card. The border is a Martha Stewart edge punch and I've used some gun metal pearls to finish off.

Thanks for stopping by.

Saturday, 20 August 2011

St Luke's Charity Challenge - Oh I do like to be beside the seaside......


The latest challenge over at St Luke's Charity is "Oh I do like to be beside the seaside". I've recently been taking the mammoth task of sorting out all my unmounted stamps which were in poly-boxes but kept getting mixed up - so I thought I'd mount them all on laminating sheets and file in individual sections in binders. You know when you start a job and half way through wish you hadn't...............!!!! lol Anyway I came across this lovely A Little Bit Sketchy stamp set "Time Flies" by Sheena Douglass and it was perfect for this challenge.

I stamped the main image using Memento ink and coloured using Flex and Promarkers. I then cut out the image and mounted it using silicone glue on a piece of card which I had sponged with blue DI for the sky. The heart shaped clouds were also stamped and cut out and added using silicone. This has been matted and layered and placed on a top fold 6x6 card. The sentiment is from the same set cut using nesties labels and I've added a dotty pink ribbon and some gems.

Thanks for looking.

Friday, 19 August 2011

Less is More - Week 28 - Ink


Well, what a wonderful excuse to get inky this week over at Less is More. But I have a confession to make........... I've actually made 3 cards as I got a bit carried away, but with all the frustrations of the email hackers this week I completely overlooked the fact it had to be a one layer card! So although mine aren't technically one layer I am going to post them anyway and hope I'm forgiven after my disastrous week - pretty please!!!! lol

I got my spin art toy off the top shelf and dusted it down. Just in case you don't know what these are they are actually kiddies toys, battery operated (although you can get smaller manual ones) and you put your piece of coated cardstock in the centre and set the machine to spin whilst dripping inks through the central opening. I've used alcohol inks here but you could just as well use acrylic inks etc etc. You can get the most amazing effects with this and for my first card I overstamped with an image which I think came from I Brake for Stamps in the States. All it needed was the addition of some ribbon.

The next one I haven't actually done anything to as it looked so much like a bird in flight that I thought it would be spoilt if I added another image. So again a piece of ribbon was added together with the sentiment which is an Anita's rubber stamp.

The third card - can you tell I was on a roll here!!!! lol - I squidged the lid of a Big & Juicy Soothing Sunset inkpad and smooched a piece of coated card over it. I then stamped the Inkadinkado butterfly on top. The butterflies are a Stampin Up sizzlet and the sentiment is from the Stampin Up Flight of the Butterfly set.

Have a great weekend.

Thursday, 18 August 2011

Nightmare 24 hours..............

Firstly can I offer a huge apology to all my friends who received an email purporting to be from me yesterday saying I was in Madrid and had been mugged at gun-point!!!!  My gmail account had been hacked into and they had changed my password etc so I couldn't access my emails or anything - it even stops you logging into your own blog.  Talk about frustrating.  But what lifted my spirits were the dozens of phone calls I received from friends checking that I was okay - they mostly realised it was a scam but wanted to check anyway - so a huge THANK YOU.  I must also say that Google have been great as I have now managed to recover my gmail account although every single email and contacts had been deleted........ what a way to have a spring clean eh?  I have managed to recover my email contacts but nothing else unfortunately but it has allowed me back onto my blog so I'm now going to post my challenge card for Bah Humbug which was what I was in the process of doing yesterday when all this blew up.

This week the lovely ladies over at HumbugHall have set the challenge as "Kiss-mas".  I've recently bought some lovely digi stamps from Teddybo and I thought the one I've used fits this challenge beautifully.  I am also entering it in the Teddybo Tuesday Challenge "Love is in the air".  The image is coloured using my new Letraset Flexmarkers and glitter glue has been added to their various "furry" bits!!!  lol  It was then die cut using a Spellbinder frameability set with the outside frame being cut from red mirri.  Paper is from Papermania Classic Christmas.  The sentiment is from the Stampin Up Punches Three set and punched using a SU scalloped square punch.  The corners are a Marianne's die and the twiddly bits on the border are waste from the same.  The addition of a bow and gems finished the card.

Thanks for dropping in and again, many thanks to all my friends xxx

Tuesday, 16 August 2011

Wedding card

Sorry not to have posted for a few days but things have been a bit hectic here (nothing new there then!!!).  Also I was asked to make a special wedding card for some neighbours who had seen the last one I had done.  Trouble with that is you have to come up with something different which also has that "wow" factor (hopefully).  There were no suggestions for what they wanted on the card apart from pastel colours.  So I started off sorting our my nicest card/papers that I could use and I also used some of the lovely backing papers from Robert Addams Complete Wedding CD.  When all this was sorted out I used my new Go Kreate Bookish dies which are remarkably like the Glitter Girls Bookatrix but easier as there are six dies and no physical cutting with scissors.

On the base layer I added some lace around the edge and then backed this layer with a photograph of the wedding location, which is Sherborne Castle Orangery, added their names, date etc and manipulated this in CraftArtist to get the right colour and theme.  Each layer was then decoupaged up using silicone and I've also added vellums to a couple of the layers to give a softer effect and run some through my Joy using an embossing folder.  The sentiment was computer generated and die cut using nesties and the bouquet was made using various flowers and gems that I had in my stash.  The butterfly is from printed acetate cut out and layered.  I then put an organza ribbon bookmark threaded through a heart embellishment and added pearls and gems to finish off.

I then made a box to match but as it is quite a large card even 12" card wasn't big enough.  Luckily I had recently bought some 14" square pearlescent card from Crafters Companion and this was the exact size I needed.  Even with my Joy I couldn't get the lid through to die cut the centre aperture so cut round one of the dies and then cut a frame from matching rose paper.  I added some lovely glittered vellum to the aperture and added the finishing touches of a smaller bouquet, ribbon, a butterfly, their initials on a die cut heart and the sentiment.

Thanks for dropping by.

Tuesday, 9 August 2011

Less Is More - Week 27 - Colour of Your Nation's Flag

This week Mandi & Chrissie have challenged us to use the colours of our nation's flags which should provide a riot of colour.  I've decided to go with the Union Jack and red, white and blue for my card.  I've taken a white linen square base card and added a strip of red organza ribbon across it.  The blue mirri and white patterned paper were die cut using nesties.  The butterfly is die cut using a Marianne's die with added gems.  I didn't have any navy/dark blue gems so coloured some pearls with a dark blue Sharpie pen.

Thanks for taking the time to visit my blog.

Monday, 8 August 2011

Bah Humbug Challenge 32- White on White

The lovely ladies over at Humbug Towers have challenged us to make a Christmas card using
only WHITE ........... I think cards made like this look really elegant although you do get to appreciate just how many shades of white there are!  For this card I started off die cutting my base card using a Go Kreate XL die.  I then used the smaller die to cut my base layer and then put it through my Joy Trouvaille in a docrafts ornament embossing folder.  I then die cut three circles, going from large to small, and put these through the same embossing folder.  Everything was then decoupaged up using silicone glue.
Happy crafting.

Sunday, 7 August 2011

You need a bit of humour when you reach 70...................

My friend and neighbour Annie had been hunting round the shops for a card for her friend's 70th birthday but couldn't find anything appropriate. So she asked me if I could make one and when I said what type she started off mentioning floral etc etc but then said her friend had a sense of humour so I knew just where to go with this one.

I made a stepper card and used backing papers recently received from Chocolate Baroque as part of my renewal of membership to the Guild. I then got out my set of "The Wrinklies" stamps from Dimension Fourth and stamped the lady with the turban and coloured with Promarkers. The sentiment is also from the same set.  I have used my Grand Nesties Book Pages for the mats, added some gems and a ribbon.  The circle sentiment was made using CraftArtist.

Thanks for dropping by.

Thursday, 4 August 2011

Bah Humbug Challenge 30 - Lace

The latest challenge over at Humbug Hall is Lace.  I've taken an 8" square card blank and using my Grand nesties cut some backing paper from Dovecraft "Let it Snow" using the largest die.  The main image is a Lili of the Valley Christmas topper die cut using the same shape nesties but in the smaller set and mounted onto some red mirri.  I've punched a border of gold linen cardstock and pleated my lace across the page.  The sentiment is from the Stampin Up Contempo Christmas set, again die cut and mounted onto gold mirri.  I've added a poinsettia, some gems and a sprinkling of snow.

Thanks for stopping by.

Monday, 1 August 2011

Less is More - Week 26 Lucky Dip - Fruit

This week's challenge over at Less is More is FRUIT.  The only stamp I have with fruit on is a Stampin Up one which has already been used by Chrissie so I turned to CraftArtist and imported a photo of a lovely apple, had a play with the layout and made up the sentiment.  Very simple and I think it confirms to the CAS design theme.  I added Diamond Glaze to the apple to make it nice and shiny although I'm not sure if the photo shows it up to its best as I had to turn it sideways for it to show up at all.............. think I need to go on a photography course!!!  lol

Thanks for stopping by.