Followers

Saturday, 7 February 2015

Runway Inspired Challenge #77 - Jenny Packham..........two cards and TIME OUT #24

There's a great challenge over at Runway Inspired Challenge.    There's also a new challenge at TIME OUT  which is to CASE the lovely card made by my good blog friend Kylie of Kylie is Addicted to Stamps & More.  Below are the two inspiration photos:


                                         KYLIE'S CASE CARD


I thought the colours and style of this dress were lovely so I set about making my card.

I know what was in my head (normally not much!!! lol) but it didn't translate very well IRL.  I started off by die cutting my Die-namics Sun Ray die in blue cardstock and backed it with a piece of grey card which I'd embossed using Craft Concepts Stained Glass e/f.  I cut the two chevron strips (Die-namics Chevron Stripes) and then die cut three Memory Box Hibiscus Flowers.  The sentiment is Stampin Up Apothecary Art and I stamped it around the sun ray die.  Here is the card put together:


As I said, I don't think it translated to completed card at all well.  I thought I'd have another go today and I was much more pleased with the outcome.  This is the card that fits in with the TIME OUT challenge.  Here it is:


I started off by taking a copy of the photo of the dress into CraftArtist and cropping it so I could make it into a background.  I then printed it off so I could use it as a base layer of my card.  I then stamped Clearly Besotted Fresh Flowers onto a die cut tag (Sue Wilson's Pierced Tags) and coloured in using my Chameleon pens and added some Wink of Stella Clear on top of the flowers.  I sponged around the edges of the tag with SU Baja Breeze.  I die cut a smaller tag and stamped a greeting from Clearly Besotted Say it in Style set and again sponged the edges.  I used the Die-namics Chevron Stripes again across the centre of the card but this time layed the smaller one on top of the larger.  I added some flowers from my stash, the leaves are Britannia Dies Leaf Flourish and the photo corners are an EK Success punch.

As I say I was much more pleased with this card.  Pop on over to the RIC blog and have a look at the lovely DT cards.  There's a great prize for the winner!  Don't forget to go over to the TIME OUT challenge blog to see all the great inspiration from the DT.

Have a great weekend.

Happy crafting.


Pony CASE-Express

The Pony CASE-Press


Hi Everyone - just thought I'd steer you in the direction of a brand new challenge, which is certainly a bit different, and run by the uber talented Mynn Kitchen of On A Stampage.  The concept is to join in the challenge and you will be placed in a queue, you will then CASe the card before you in the queue and then mail your card to the person whose card you've just CASed.  So you need to be up for posting cards internationally!  You can enter your name to join in the fun as many times as you like.

Pop on over to Mynn's blog and have a look at how it works and the rules of the challenge - it really sounds like fun and I can't wait to join in.

Happy crafting.


Thursday, 5 February 2015

Less is More - Lucky Dip Week

Hi Everyone

It's Lucky Dip Week over at Less is More and the theme is "Little Ones" and you may interpret this in any way you choose... babies, children, small elements on your card... whatever your imagination dictates.

I decided to go for a baby card and here is what I made:


I've used the stork and bundle from my Little B Baby die set and coloured using Promarkers. The die cut words are Tattered Lace and I've used Lil'Inkers Stitched Squares for the mats.  As I'd used the largest of these dies for my last mat - and I wanted a stitched design on my base card - I used the straight stitched die from my Paper Smooches Stitched die set.

For some reason the base card looks cream in the photo but it's definitely white although it's pearl white, so maybe that's why it's showing up differently to the other white card.  Looks fine IRL!!!!

So glad you popped by - hope you're all having a good week and looking forward to the weekend.

Happy crafting.


Wednesday, 4 February 2015

One-Layer Simplicity Challenge OLS13: You Blend!

Afternoon all.  I was having a wander round blogland yesterday and came across a tutorial for Bokeh. I've seen quite a bit about this recently so thought I'd give it a try.  When I finished I realised it fitted the OLS challenge very well.  Here's what I came up with:


I chose two colours - SU More Mustard and Mellow Moss and sponged and blended the colours onto a piece of white cardstock.  Set aside to dry and then punched some different sized circles out of another piece of card to use as a template.  I then placed the circle template over my coloured background and sponged SU Whisper White ink through the apertures.  Now you've got your panel sorted you just need to make it up into the finished card.  I added some die cut sequins, the sentiment is SU Wetlands and the label punch is SU as well.  Finished touches were the addition of some bakers' twine and then matted and layered it up on cardstock from my stash.

Thanks for dropping by.

Happy crafting.


Tuesday, 3 February 2015

Happy Little Stampers February Sketch challenge & Showcase your Style


Hello to all my friends, followers and fellow bloggers.  Thanks for dropping by today.

A really quick card today to enter into the Happy Little Stampers February Sketch challenge.  Here is the sketch:


I thought it was so pretty that the temptation was to actually recreate it!!!  But I think that defeats the point..............so here is what I came up with:


I started off with a blank 5 x 7 card and using Memento London Fog stamped Stampin Up Off the Grid stamp and then over stamped with three different Paper Artsy Mini grunge stamps.  I then die cut two mini and one normal Memory Box hot air balloons out of d/p from my stash.  Popped them up with silicone and then stamped the sentiment from Sheena Douglass's A Little Bit Sketchy Only Words - From the Heart using SU Pumpkin Pie ink.

This also fits with the Showcase your Style challenge.  Thanks for the heads up Dippy. Here is their challenge photo:


Have a great day.

Happy crafting.


Monday, 2 February 2015

CASE-ing Christmas: Challenge #5

Hello everyone from a very cold Somerset..........winter thermals, socks and hats weather, that's for sure.  Still, at least we're not snowed in as some people are so we should be grateful for that.

Thought I'd join in the fun over at CASE-ing Christmas - here is the card that Mynn has chosen to CAS(e):


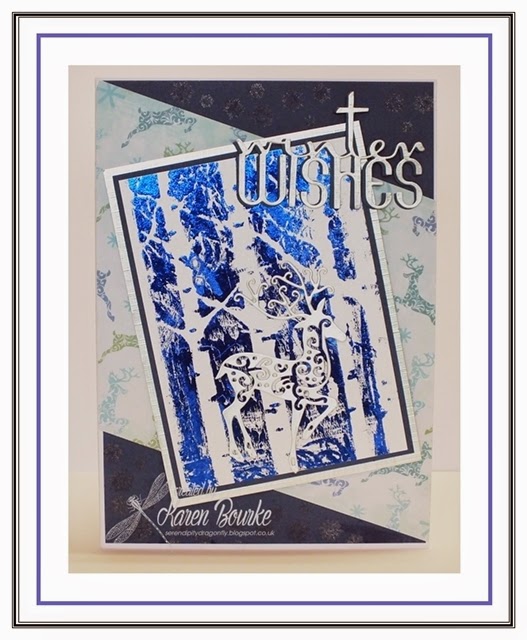
As soon as I saw the birch trees that Mynn had stamped on her card I immediately thought of my Memory Box Garden Birch Trees stencil and as I had just been watching Julie Fei-Fan Balzer's video tutorial on using rubber cement and foils with stencils I thought I'd play along.  This is what I came up with:


Firstly I placed the stencil over a piece of white cardstock and used the rubber cement brush to cover it with the cement.  I then took off the stencil and washed it clean.  The rubber cement is so thick that it stays exactly where you put it and so doesn't run under the stencil.  As soon as it goes slightly opaque it is dry.  I then took some navy transfer foil and placed it dull side down over the rubber cement and used my bone folder to rub over to make sure the foil was in contact with the cement. When you're happy with the result remove the foil and then you can make up your card - I matted and layered onto navy and silver cardstock.  I adhered a blue cardstock layer to the base card and found a scrap of Christmas paper which was placed at a "jaunty" angle (!!!).  I added my topper, a die cut reindeer (Tattered Lace) and a drop shadow sentiment which is a Penny Black die.

Thanks for popping by and taking the trouble to wander round.

Happy crafting.


Wednesday, 28 January 2015

One more for Happy Little Stampers...........and ATSM Challenge #129

Hi Everyone - from a pretty wet and windy Somerset.............

As I had some background card left over from my play with the Brushos I decided I needed to make another card and as the Happy Little Stampers Challenge - Watercolouring - is still open I will be entering it there.  Also there is as new challenge over at ATSM #129 which is CAS so I'll pop my card over there as well.  This is what I came up with:


I used my Stampin Up Wonderful Wings Sizzlets folder to die cut the five different size butterflies (each one three times), popped them up on top of each other with silicone glue and added them to my top fold A6 card.  I brushed Clear Wink of Stella over the top of each to give them some shine.  The sentiment is Stampin Up stamped in Versafine Purple ink.  I then added three pearls in three shades to match in with the butterflies........but somehow in the photo they don't look as if they match as they do IRL!!!

Thanks for dropping by - keep safe and warm.


Monday, 26 January 2015

Happy Little Stampers Watercolour and Less is More sketch 14 challenges


Hi Everyone

Think I'm just in time to enter the Happy Little Stampers latest challenge which is watercolouring and also the sketch challenge over at Less is More. Here is the sketch:


I had a bit of a play with my Brushos and some watercolour paper - this stuff is absolute magic and you never know what you're going to get, so it can be a bit hit and miss but definitely lots of fun!  Here is what I came up with:


After I'd made a piece of background paper I dried it with my heat gun and then put it between two reams of cardstock overnight to straighten it out. 

First I took the second smallest of my Lil'Inker Stitched Circle dies and die cut a circle from the centre of the watercolour paper.  I then positioned my Die-namics Fishtail Flags largest die and placed it over half the negative circle and partially die cut it as I didn't want the bottom pennant to cut.  I then took it out of my Big Shot and turned the die round so the straight line would cut, wiggled the die around until I felt it "bite" so I knew it was in the right place, and put it through again to finish the cutting.  I decided to also cut the smallest stitched circle die to put on top of the larger circle.  I then took the bluebell stamp from Clearly Besotted Fresh Flowers set and a butterfly and the sentiment (stamped with Versafine Purple ink) from Clearly Besotted Elegant Butterflies set and stamped with Versamark ink and then used my silver detail e/p over the top and heat set.

Apologies for the photo but whichever way I tried it not all the silver embossing showed so ended up propping the card up slightly...........so the angle may look a little bit odd.

Thanks for stopping by - all your comments are very much appreciated.

Happy stamping.


Wednesday, 21 January 2015

Triple Heart Easel Card Tutorial.........picture heavy!!!

Hi again everyone.  After my posting the triple heart easel card yesterday one of my blogging buddies, Sylvie of Gibmiss, asked if I had a tutorial for it.  Well I didn't...........but I do now! lol  

Please be warned this tutorial is picture heavy!

You will need:

  • Spellbinders Hearts and Scalloped Hearts dies (3 largest from each set used) or any other heart dies
  • White cardstock
  • Patterned d/p
  • Embellishments


Step 1

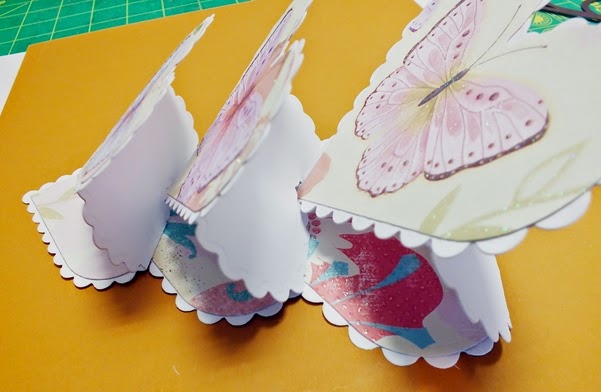
Cut three pieces of cardstock 8” x 4 ¾” and fold in half.  Lay the largest scallop die on the front of the c/s with the top of the heart slightly over the fold.  Do this with the two other dies so you end up with three “cards” in the three sizes.


Step 2

Fold the top half of the heart cards in half and crease.


Step 3


Die cut three more scalloped hearts on single layer white cardstock.     

Step 4

Die cut your designer paper using the three sizes of the plain heart dies.  You can just do the three to add to your single hearts but I did six so I could also layer onto the base.

Step 5

Add the plain hearts with the d/p onto the folded heart cards (as you normally would for an easel card) and add the d/p onto the bases if you want to complete this step.


Step 6

Attach the three heart easel cards together as per the picture.  The largest heart easel will “stop” behind the middle heart and the middle heart will “stop” behind the smallest heart.  You need to make a stop for the smallest heart……..I used a flower, but you could just as easily use the smallest heart die cut and pop up on some d/s foam.


Step 7

Add your embellishments as required.

Hope you all found this useful.  I've just got the Little B hearts die set which are larger than the Spellbinders and these are what Martine at AbFabDesigns used.

Happy crafting.


Tuesday, 20 January 2015

Triple Heart Easel card

Hello everyone

It's pretty cold and damp down here in Somerset but just got back from a lovely lunch with two of my crafting buddies.

The other day my friend Martine of Ab Fab Designs posted a lovely triple easel card she'd made and I was so taken by it I just had to CAS(e) it.

I needed to make a birthday card for my friend and neighbour Inga so decided to have a go at the triple easel card.  I didn't have the Little B heart dies that Martine used (which are larger) but decided to use my Spellbinders Hearts and Scalloped Hearts dies.  Here's what I came up with:


Each heart is a separate card and all three get joined together at the end.  It's really clever as the largest heart clips into the middle heart and the middle one goes into the smallest one, so all you need to do is make a "stop" for the front heart.  All the flowers and pearls are from my stash as was the paper.  The alphabet dies are Tattered Lace Elegant Alphabet and the Happy Birthday is Elizabeth Craft Designs 717 Happy Birthday - both cut out of blue mirri card.

Now I thought I'd share something with you all.  There was a Papertrey die I really wanted........it was $3 but the only place you can buy these dies is from Papertrey directly.  Unfortunately their shipping costs are pretty high but a girl's got to do what a girl's got to do eh?  Very quick service - the die arrived this afternoon.  Now I know why the PTI cost of shipping is so high - take a look at these photos and let me know what you think!!!!


Excitement.......a big parcel from the USA!!!


What?????  All there is in here is paper packing!


Oh, here it is.......one wafer thin die in an envelope measuring 3.5" x 5"!


Crazy or what!!!!!!!!


Happy crafting.


Friday, 16 January 2015

As you like it..............

Happy Friday fellow bloggers, followers and friends.

I was playing with a few things on my desk when I saw a new challenge over at As You Like It and it is asking you to show off your favourite embossing folder and give your reasons why.  Well, I just happened to have an embossing folder on my desk which I've had for yonks but never used so thought this would fit the challenge perfectly.  As it's a NBUS it fits in with my friend Dippy's latest challenge over at djkardcreations and also with CASology - so I'm entering this card in both of these.

The embossing folder I've used today is a Spellbinders 3D M-Bossabilities folder called Delightful Daisies.  It is so pretty and gives a really clean and crisp impression and would suit any occasion so it's really versatile.  Here is my card:


Card blank is 6x6 so I cut down the embossed panel to fit making sure I got the large daisy and the butterfly fully on the card.  Matted and layered onto cardstock from my stash.  The piece of card on top of the embossed panel came about by using my Lawn Cuts Stitched Hillside Borders and the sentiment is from Hobby Arts, using Versamark ink and gold detail e/p.  Final addition was a small ribbon bow.

Thanks for stopping by.  Wishing you all a very happy weekend.

Happy crafting.


Wednesday, 14 January 2015

Two for one.............

Well, I must be on a roll!!!  Either that or I'm dodging doing the VAT returns..........hmmm!

Anyway, I thought I'd join in the fun over at my friend Dippy's (Darnell to everyone else.....) blog djkardkreations where she has a NBUS challenge going on.  NBUS to the uninitiated means Never Before Used Schtuff.  Then I got another email saying she had been asked to be Guest Designer over at CASology collaborating on the same theme.


 Hence the two for one in the post heading.  Anyway come and have a look at my creation:


This card was pretty straight forward and I've used Sue Wilson's Striplet die - Floral Meadow, using the outside edge die to make a frame.  I sponged some colour through the striplet die to give some colour to the flowers.  This was then mounted onto some mats but put some glitter card behind the striplet.  The sentiment frame is Sue's French Collection - corner, border & tag set and the bow is Finishing Touches - filigree 3D itty bitty bows.  The embossed section of card is Creative Expressions Eternal embossing folder - isn't it pretty?  I then just added some pearls to the centre of the flowers.  Everything is new apart from the bow and tag dies.

Thanks for popping by - don't forget to jog on over to Darnell's blog and take a look at the CASology challenge as well.

Happy crafting.


Tuesday, 13 January 2015

LIM Challenge 206 - One Layer

I'm back again with a couple of cards.  The first one is for the LIM Challenge 206 which is one layer with the theme of New Beginnings.  It's an absolute age since I entered a LIM challenge but I just received a stamp set with a magazine - would you believe that it's called New Beginnings!!!  Co-incidence or what?  My friend Dippy (djkardkreations) has just pointed out to me that this card would be perfect for the NBUS challenge and also the new CASology challenge so I'm going to pop over there to enter as well.

I chose to use the baby in the hammock image for my card.  Stamped in Memento ink and coloured using my Chameleon pens.  The sentiments also came from the same stamp set.  Hope I'll be forgiven for adding a tiny ribbon!!!


My second card is using the free HOTP feather die and matching stamp set and stencil - both coming with craft magazines.


I started off by using the stencil and glitter embossing paste to create the feather in the bottom left hand corner.  I then die cut a feather and sponged with DI's and finally used the feather stamp and die for the third feather.  I sponged through the stencil with DI onto the main panel to create some interest and added one of the other stamps.  The corners have been punched with an EK Success corner punch and I added some pearly and a ribbon.  Matted and layered using cardstock from my bits box.

Thanks for dropping by.

Happy crafting.